Soul Food Studio

Crafts

Upmarket Luxurious Upholstered Footstool

Crafts, AllAmanda Russell

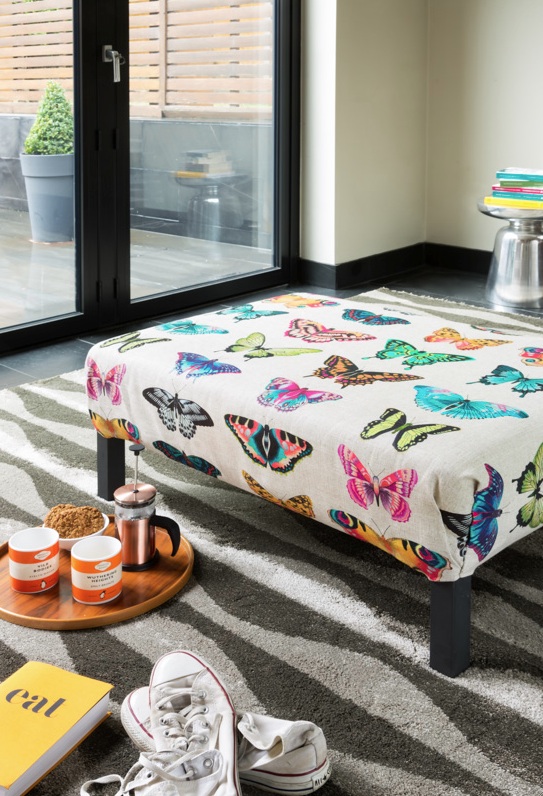
Yawn, yawn, a coffee table's a coffee table's a coffee table. I wanted something a little different and an upmarket luxury upholstered stool fitted the bill perfectly. It just took an Ikea coffee table and lots of imagination to make it into a fab statement footstool. 

You will need:

  • Nornas coffee table, Ikea

  • Fabric

  • Cot mattress

  • Wadding

  • Saw

  • Tape measure

  • Staple gun

  1. Before assembling your table, measure halfway down each of the legs and saw them in half.

  2. Paint the legs and the underside of the coffee table with black paint. Once the paint is dry follow the instructions to put the table together.

  3. Cut your mattress to fit the top of your coffee table. Piece the off cuts together to make a shape that fits the table top.

  4. Place the trimmed mattress and off cuts on top of the table and cover with wadding. Staple the wadding to the underside of the table to hold everything together.

  5. Lay the printed fabric on top of the wadding and staple underneath. For neat corners fold and sew the fabric in place.

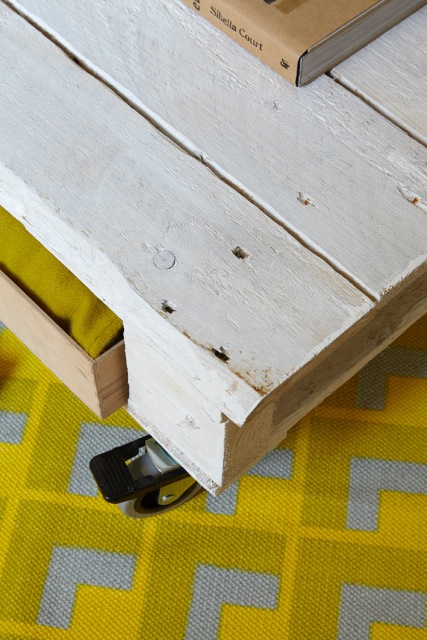
If you like this blog post why not read my post on creating an up cycled pallet coffee table

Turn a wine box into a great shelf

Crafts, AllAmanda Russell

Turn an old wooden wine box into a shelf by painting, wallpapering and adding screw holders at the side to attach it to the wall. I chose a lovely blue paint and wallpaper from Mini moderns, one roll will go along way and that means that you can cover files, books and other shelves too.

You will need –

  • Wooden Wine box

  • Minimoderns Emulsion paint lido £5.00

  • Paint brush

  • Minimoderns wallpaper Darjeeling £50

  • PVA glue

  • Scissors

  • Picture frame brackets Homebase

  • Screw Driver

  • Electric drill black and decker

  • Masonary screws

  1. Paint the exterior of the box with emulsion paint.

  2. Mix pva with a little water to the consistency of double cream and paint the inside of the box to seal.

  3. When dry measure and cut wall paper to size. Paint the reverse of the paper pieces and insides of the box with let down pva.

  4. Press the paper in place rubbing down any stubborn bubbles.

  5. When dry screw picture frame brackets to the side, then screw to the wall.

Tip

  • Wood can be very absorbent and suck up paint, to get an even coat first paint the box with emulsion which has been let down with a little water.

If you like this blog post make sure you read my list on creating your own Designer Work Station 

Upcycled Pallet Coffee Table

Crafts, AllAmanda Russell

I'm in love with this pallet coffee table. Not the the best at being tidy and I do like space to style up, this helps with both! Loads of storage space under the top to slide in shallow boxes and lots more on top for books and plants. 

You will need:

  • -Two wood pallets

  • Surform

  • Emulsion paint

  • Scumble glaze

  • Bucket

  • Screws

  • Drill

  • Four castor wheels

  • Basket trays

  1. Carefully remove the long slats from one of your pallets, then screw them onto the base of the other to make support for the drawers to sit on..

  2. Using a surform (a tool similar to a cheese grater) remove any loose bits of wood from the pallet surface, edges and underside.

  3. In a bucket, mix 100ml of scumble glaze with 400ml of emulsion paint, add a little water to thin the glaze. Brush onto the wood. I chose white to give a white-washed look.

  4. Turn your coffee table upside-down and screw a wheel to each corner. Finally slide storage boxes into the gaps under the top.

If you like this post make sure you check out my post on Printing your own Labels

Create Your Own Gorgeous Vintage Letter

Crafts, AllAmanda Russell

How often have you longed for a trendy battered statement vintage letter? I show you how to create your own for a fraction of the cost.

You will need:

  • White foam board

  • Pencil

  • Steel ruler

  • Glue gun

  • Paintbrush

  • Metallic emulsion

  • Cellulose sponge

  • Dulux Matt Emulsion Caribbean Coral

  • Craft knife

  1. This letter is 30cm high and 7cm deep, for an easy job be sure to choose a letter without curves! Draw up the letter on white foam board then cut out using the steel ruler and craft knife.

  2. To make the walls of the letter cut strips to the length of each side and 7 cm high. Glue in place with the glue gun.

  3. Paint all surfaces with emulsion, then leave to dry. Pour a couple of tablespoons of the metallic emulsion paint into a shallow dish. Stir in a few drops of water to thin paint to the thickness of pouring cream.

  4. Tear off a section of sponge, 8cm square and immerse in the paint, remove and wring out excess paint. Dab the sponge on all the surfaces of the letter, making sure you get into the corners. Leave it to dry, then even up the finish by going over with a second coat of paint.

Tip

  • Make this a really thrifty project and use paint left over from another project or buy a match pot of your chosen colour.

If you like this post make sure you check out my post on how to make your own cushion cove

Unique Space Saving Ladder Plant Stand

Crafts, AllAmanda Russell

Have you noticed the great plant invasion in every interior recently? They can take over all your surfaces so here's a project for a handy ladder plant stand that makes a gorgeous tired indoor garden. Use it to grow plants on as well as herbs for the kitchen. With bags of handy storage you can't help but make space for it in your life.

You will need:

  • Saw

  • Screws

  • Black and Decker drill and jig saw

  • Paintbrush

  • Dulux Matt Emulsion paint

  • Spirit level

  • Scrap wood selection for shelves and battens

  1. I used all my scrap wood for this project, a couple of old boards for the shelves and stripwood in a variety of dimensions for the supports. It was a very mixed bag of scraps so to start with I painted the ladder and all the wood with emulsion for a uniform colour.

  2. To make the ladder lean against the wall you need to adjust the back legs. Put up the ladder, then lean the back legs against a wall so they are perpendicular to the floor. Hold in position, this will raise the front legs off the floor. Measure the distance between the floor and the front legs. Measure and cut this amount off the back legs, now the ladder will hold its position against the wall.

  3. Next add battens on the back legs for shelf supports. Place the spirit level on the bottom step, then use a pencil to mark the position on the back legs. Measure the distance between the back legs, cut a batten from strip wood and screw in place. Repeat for the remaining steps.

  4. Measure for shelves then cut wood to length. Screw each shelf in place on the step and batten. Touch up the ladder shelves with emulsion.

Cheats:

Emulsion paint is quick and easy to use, surfaces need minimal preparation, it gives great cover and the brushes are easy to wash clean.

If you liked this post check out my blog post on how to make a retro tiled coffee table 

Must Have Retro Tiled Coffee Table

Crafts, AllAmanda Russell

Customise your own retro tiled coffee table, take a cheap as chips high street coffee table and give it enviable style and originality with this easy project. I used ceramic pens to add designs to budget white glazed tiles, easily sourced from any of the diy sheds.

You will need:

  • Coffee table

  • Tiles

  • Ceramic pen

  • Tile adhesive

  • Grout

  • Edging strip

  • Black paint

  • Paint brush

  • Beading for edging strip

  • Panel pins

  • Hammer

  • Saw

  1. Choose two designs for the pattern on the tiles and then draw on with the ceramic pen. Leave tiles to dry.

  2. Paint the table with black paint.

  3. Arrange the tiles on the tabletop, keeping the design random, combine patterned and plain tiles. When you’re happy with the design take a photo to use as your guide as you stick the tiles in place with tile adhesive. I stuck these tiles snuggly against each other. Leave to dry.

  4. To neaten the table edge cut a retaining strip from beading then secure in place with panel pins.

  5. Grout the table, leave to dry. Paint the retaining strip to match the table.

If you like this make check out my Upholstered Footstool post

Designer Work Station

Crafts, AllAmanda Russell

I'm always designing and making at Soulfood Studio and I wanted a worktable I could stand at for designing and cutting out projects. I love this faux bois budget station, it gives me everything I wanted, loads of style, a big worktable packed with extra storage. It was super easy to make combining readily accessible Billy bookcases and a flush door, the project is pulled together using an easy bang on trend faux bois paint finish.

You will need:

  • 4x Billy bookcase

  • Flush door

  • Emulsion paint

  • Varnish

  • Universal primer

  • Roller and tray

  • Masking tape

  • Kitchen roll

  • Paint brush

  • Paint kettle

  • Bucket

  • Measuring jug

  • Spoon for mixing

  • Graining Rocker and Combination comb available online

  1. Follow the instructions that come with the Billy bookcases to assemble the four worktable supports. To make the bookcases boxier, we cut the lower skirting section off at the base with a saw, making the bottom shelf flush with the floor.

  2. Paint the bookcases, shelves and door with primer suitable for melamine, and then use a roller to apply two coats of the white emulsion.

  3. Paint lining paper with white emulsion so you can practice the faux bois graining technique. For the graining glaze mix together 1lt orange emulsion with 1lt acrylic scumble glaze. Paint a generous coat of glaze onto the lining paper. Take the graining rocker and pull through the glaze using a rocking motion to create the wood grain design. When you are happy with your paper practices start graining the furniture surfaces.

  4. To get varied woody effects, try using different rocking speeds and for simple graining use the combination comb dragged through the glaze. For best results be generous when applying the glaze and work quickly. To work the glaze while it stays open paint and grain in small sections, brush the glaze on in stripes the width of the graining rocker. After each pass clean off graining tools with kitchen roll. Don’t forget to paint the edges of the shelves and table top, glaze and run the comb over it.

  5. When all the furniture surfaces are faux bois grained, leave to dry thoroughly for a couple of days, to protect the surfaces apply varnish before assembling the furniture. To make the structure more secure use a very strong wood adhesive product, cutting out the need for nails and screws,

If you like this post check out my post on Styling with plants

Quick and Easy Step By Step Cushion Cover

Crafts, AllAmanda Russell

As a stylist I hold my hand up to many vices and one of the worst is fabric hoarding. Lots of us have fabric stashes waiting to be transfomed into something useful for our home, but when? Here’s a quick and easy step by step cushion cover project that’s perfect for using up fabric pieces.  Bring out your inner designer to create something beautiful for your interior. I’ve used some blissful fabric I hand blocked at a workshop with interiors Guru and shop Tobias and the Angel.

Cushion dimensions are not given, you choose to fit with your fabric and cushion sizes.

You will need

Scissors

Pins

Thread

Sewing machine

Zip

Measure your cushion, add Icm to each side for the seam allowance. Cut out fabric for cushion front and back.


Take the cushion front and turn one edge in by 1cm iron down, then repeat with the cushion back.

Take one piece of fabric and right sides out pin the zip to the turned edge. Then sew in place using the sewing machine fitted with the zipper foot.

Repeat with the remaining piece of fabric on the other side of the zip.

Open the zip by 7 cm, with right sides facing pin then sew around the 3 remaining sides of the cushion. Clip the corners.

Slide the zip open, then turn the cover through the opening so it is right sides out. Press the seams open before pushing cushion into the cover and sliding the zip closed.

Credits

Pins, needles

Korbond sew.korbond.co.uk

Sewing machine

Janome janome.co.uk

Scissors

Fiskars

If you like this post check out my post on Printing your own Labels


How to Get Printing Your Own Unique Labels

Crafts, AllAmanda Russell

Making was always my passion. Growing up in my family it was like that. Make biscuits, that wasn't the end, you didn't sit down and tuck in, oh no, it had to be presented beautifully. What was the point of spending time making something and then not finishing it off properly?

I've been busy cutting stamps from rubbers to label jars of marmalade, and chutney, packets of biscuits and bottles of hooch. Rubbers are so soft and cutting with lino tools is easy. Ink up using a stamp pad and your ready to print labels as you need them. 

When you have down time what do you like to make?

Photo 18-01-2017, 08 24 41.jpg

If you like this post check out my post on how to make Mattisse inspired wall art

Kokedama Moss Ball Plants: Space saving plants

Crafts, Interior, AllAmanda Russell

Pressed to find pace for plants in your home? Get creative, make Kokedama, moss wrapping whatever plants take your fancy, herbs for the kitchen, ferns in the bathroom, spring bulbs, the choice is infinite. Suspend your moss ball plants, over the table or in a corner to create a hanging wonderland.

Making is my escape, even better when it’s something for my home. Kokedama is my guilty flight of fantasy, for me it's often about bringing the outside indoors. Flexing the creative muscle, the best tonic when I’m feeling jaded.

My kind of fun, getting in the flow, how do you recharge your batteries?

If you like this post you should check out my post on Kokedama Inspiration